Intro
This is a really simple box mod that can handle 20A at 2.7V, which is about 0.2Ω. The total build time was less than an hour, and total cost was around $25.
This box mod is designed to be really easy to maintain. It uses parts that can be obtained at most electronic hobby stores (like Radio Shack, except the 510 connector may not be available).
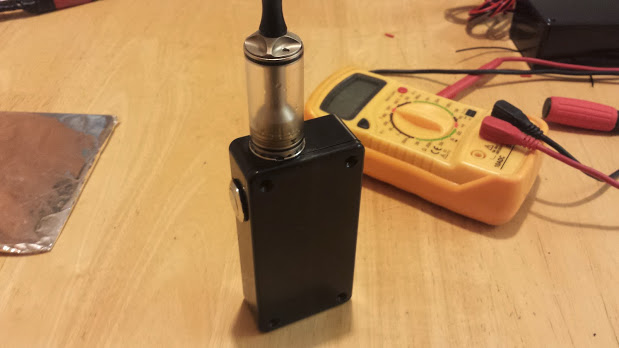
The assembled box mod.
Parts Needed
- Approximately 100mm each of red and black 18 gauge AWG. Should be about $1.
- 1x 510 Connector. I prefer the 510 V4 Low Profile from Fat Daddy Vapes. $4.
- 1x 15K Ω Resistor. $0.25
- 1x 18650 Battery Sled. I found some on Amazon for about $2 each. However, they had 22 AWG wire which has a low Amp rating. I soldered some 18 AWG directly to the sled contacts.
- 1x Momentary Switch. Any momentary switch will do, but I found a fancy tactile switch on Amazon for $6.
- About $1 worth of Rosin core solder.
- 20A Fuse. I originally purchased a fancy resettable fuse, but I broke it (I don't have a solder station, so it's difficult to keep the temp low enough to avoid damaging this fuse). So I just grabbed a 20A car fuse for about $0.25.
- A plastic box that has at least 50mm x 25mm internal space. I found a hammond box for $5 on Amazon. You could also use an altoid tin (or other metal box) if you're careful enough to insulate the components.
- Any high-drain 18650 battery at 3.5v to 4.2v, as long as max continuous drain is at least 20A, and it's the appropriate type for the sled. I'm not counting this towards the price, as most of you will already have multiple 18650 batteries.
- A power MOSFET that meets the following requirements (costs between $3-6):
- At least 20A rating (on).
- Low resistance (less than 100mΩ).
- Has G, D, and S pins.
Schematic
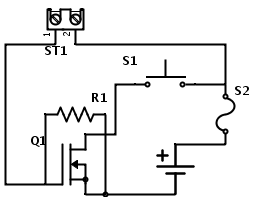
I tried to make a fancy legit schematic. R1 - 15K Resistor. Q1 - Power MOSFET. ST1 - 510 Connector. S1 - Momentary switch. S2 - 20A Fuse.
Building

Everything connected
1. Drill some holes in your case.
You'll need to plan this out a little bit.
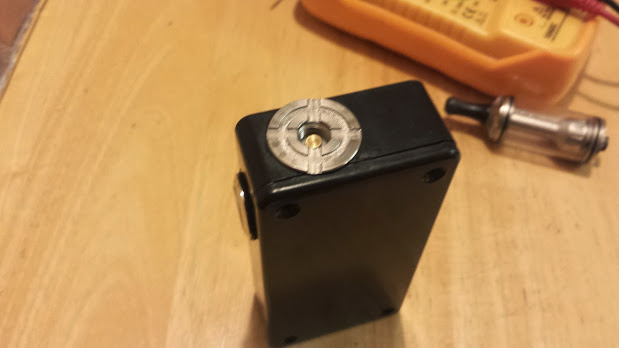
One hole is needed for the 510 connector, which will vary depending on the size of the connector being used.
Another hole is needed for the momentary switch. This hole size will also vary depending on the size of the switch.
2. Solder 15K resistor to the MOSFET
A MOSFET (sometimes called MOSFET Power Transistor) is just a solid state switch that allows more current through than a mechanical switch. Most mechanical switches only handle between 2-5 Amps. If you're using a sub-Ohm atomizer, you will not get enough current, and can possibly fry the switch. A MOSFET can handle much higher currents. It's necessary. Really.
The resistor should be soldered onto the MOSFET between the 1st and 3rd pins. My understanding of this is that the resistor prevents too much current from jumping through the mechanical/momentary switch.
The first MOSFET pin connects to your push-button momentary switch. The second MOSFET pin connects directly to the 510 adapter (and the negative side, so the ring part, not the positive pin).
3. Solder 18Ga red wire to the 1st MOSFET pin and attach to switch
This is pretty straight forward. The wire should be long enough to reach the momentary/mechanical switch from the MOSFET.
For the momentary switch, it doesn't matter which side you attach the red wire to.
Note: You may want the wire to go through the case hole where the switch will be installed.
4. Solder 18Ga black wire to the 2nd and 3rd MOSFET pin
The middle wire should be long enough to reach the ring or chassis of your 510 connector.
The last wire, on the 3rd MOSFET pin, should be long enough to reach the negative terminal on the 18650 battery sled.
5. Solder black and red wire on the battery sled.
The black wire should be the wire from the 3rd MOSFET pin. It must connect to the negative terminal on your battery sled. This is usually the terminal with a spring.
The red wire should go from the positive terminal on the battery sled to the fuse.
6. Attach the positive wire to the fuse.
A fuse isn't really necessary, but it's preferred. The fuse prevents your battery from over-heating and potentially causing a small explosion in the event of a short. The down side to this is that you'll need to replace the fuse if it's blown, but the fuse is about $0.25 -- much cheaper than the battery.
The red positive wire from the battery sled can be directly soldered to the fuse, but you may want to use a blade connector, as it will make replacing the fuse easier.
7. Attach two strands of 16ga wire to the fuse.
These two strands will be connected to the side of the fuse that's opposite the positive wire from the battery sled.
One of these new strands will connect to the momentary/mechanical switch (the opposite side of the strand from the mosfet).
The other new strand will connect directly to the positive post of the 510 connector.
8. Attach one of the fuse wires to the mechanical switch.
Take one of the added wires from step #7 and connect it to the momentary/mechanical switch's free terminal.
9. Attach one of the fuse wires to the positive post on the 510 connector.
Take the other free wire from step 7 and solder it to the positive post of the 510 connector.
If the positive post isn't removeable, then you'll need to make sure the wire is threaded through the case so that the 510 connector can be placed in the case without wires exposed.
10. Stuff it all together.
And add your battery...

All stuffed together
11. Enjoy